DIY Meme-Print Tee ("like a Boss" Version)
Hello there <3
Time for a new fashion DIY since I've mention this in my first introduction... ^^
This post deals about how I made this funny and cool tee with this meme print.
I thought it would be a cooler and nicer way to wear a usual basic shirt.
In this tutorial I only design the front of the tee but not the back but of course it's just left by you whether you also want to draw something on the back.
I show you the version with the "Boss-Meme" but you can also use any meme you want to pimp your tee with...
So I just show you how I do my tee but it's actually the same with all prints. :3
What you need : - basic shirt (any color you like. I'm using white)
- Some fabric maker (depends on the color of your tee. I'm using black)
- Pencils
- White paper
- Tape
- Cardboard
Let's start !!!!
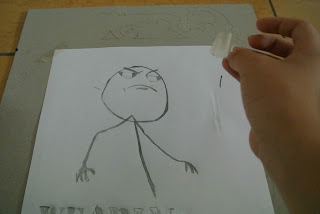
1. Choose a a nice meme you want to have on your tee and start drawing a template on a (big enough) piece of paper. You can also search for the right template in the internet and print it directly out...
2. Take a few pieces of tape and stick your template on a cardboard.
3. Then but the cardboard with the template inside your tee and make sure to have any folds over the print so that you can see a lightly shimmer of you template under the fabric.
3. Now draw with a pencil the template on your tee. This step will make it for you much easier to draw the meme with the actual fabric maker. ^^
4. In the last step you only re-draw with your fabric maker the template on your tee again.... and that's it !!!
Oh and don't forget to iron it 'cause this will make the print last longer :3
What do you think about this print..? Do you think of doing it on your own now...?
I hope I've gave you guys some inspirations <3
Thanks for reading my DIY. I hope you like it.
And if you like check out my other posts ^^


That's creative and you just trace it? Your hands must be super steady haha. Thanks for sharing!
ReplyDeletelovely blog!
thepanpan.blogspot.com
Haha thank you :3 yeah I just trace it but it tooks some time.... anyway thanks for reading my tutorial!
Deleteyour really pretty!!
ReplyDeletedoes it work on any type of t-shirt?
check out my blog maybe please?
charrmyn.blogspot.com.au
Awwww thank you *-* I think it should work with any kind of shirts, but to be honest I only work wit cotton shirts,yet..lol... but thanks for reading my tutorial :3
DeleteThis tshirt is really cool! :D I really like it~ :)
ReplyDeleteThis post is very helpful! I'm pretty much a DIY fan myself! I'm in love with your blog! I would love for us to follow each other! Just let me know if you followed my blog already so I can follow you back right away! Hoping to see you on my GFC :)
ReplyDeleteKeep in touch!
-Eva
www.creativecapricebyeva.blogspot.com
Thanks for reading my tutorial <3
DeleteI also have a big passion for DIYs.
It would be great if we follow each other but my PC is in Repair right now.
But I'll definitely follow zoi back as soon as I'm able to do it.
(^w^)
Hello~! I discovered your blog through Mindy ♥
ReplyDeleteI love this awesome shirt!! I'd wear that in a heartbeat because I am a big fan of memes. New follower here ♥
www.majoriezoleta.blogspot.com
Aww *-* thanks for reading my tutorial.
DeleteAnd for me memes are simply the coolest :)
Also thank you for following my blog... <3
I love how you customized a simple white tee and how you actually styled it with your selca! :) I'm gonna try this too!
ReplyDeleteI'm inviting you to join the Christmas giveaway I'm hosting with other bloggers http://urhappybunnie.blogspot.com/2013/12/christmas-bloggers-giveaway.html
Oh my god, I actually thought you bought the meme top! It looks so good! I want to make one myself - except I can't draw for my life urgh.
ReplyDeleteNow following you blog on GFC! Follow me back maybe? x
michelleytan.blogspot.co.nz